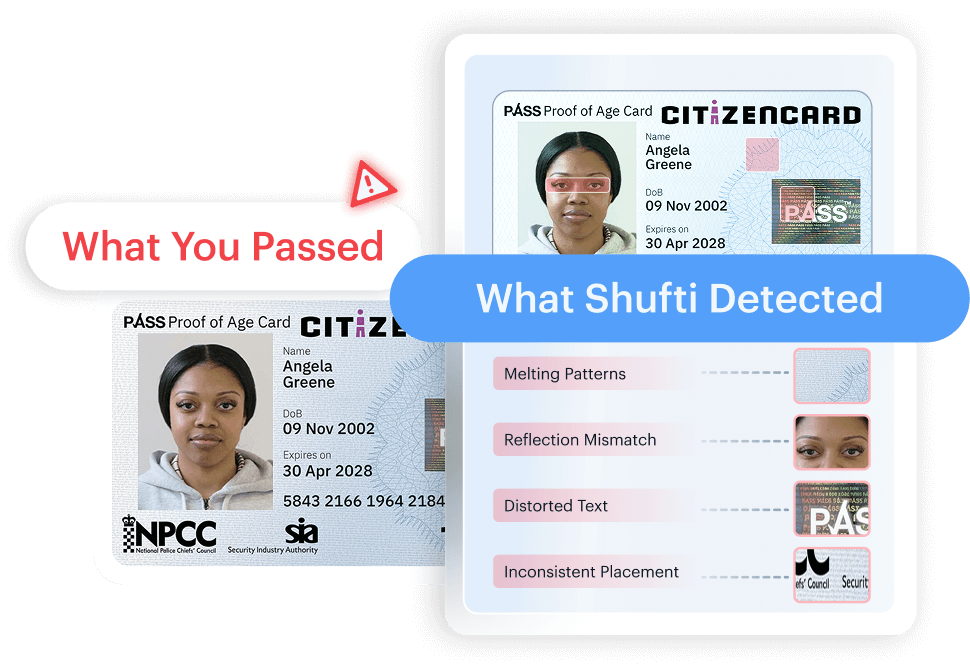
Blind Spot Audit
Secure fraud your IDV already approved.
 Runs On Your Cloud
 No Data Sharing
 No Contract Required
 Explore Now
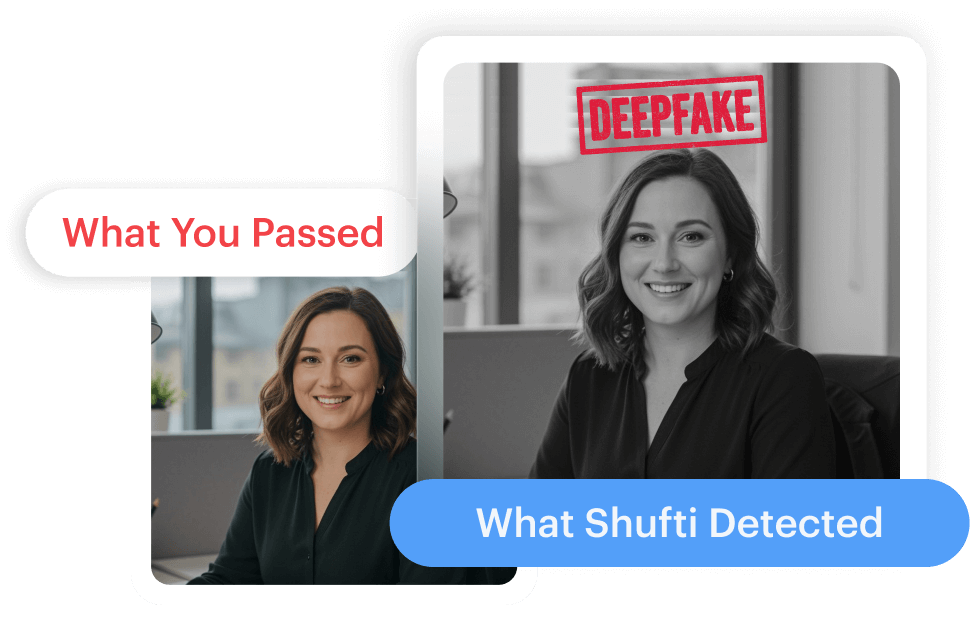
Deepfake Detection
Check where deepfake IDs slipped
through your stack.
Runs On Your Cloud
No Data Sharing
No Contract Required
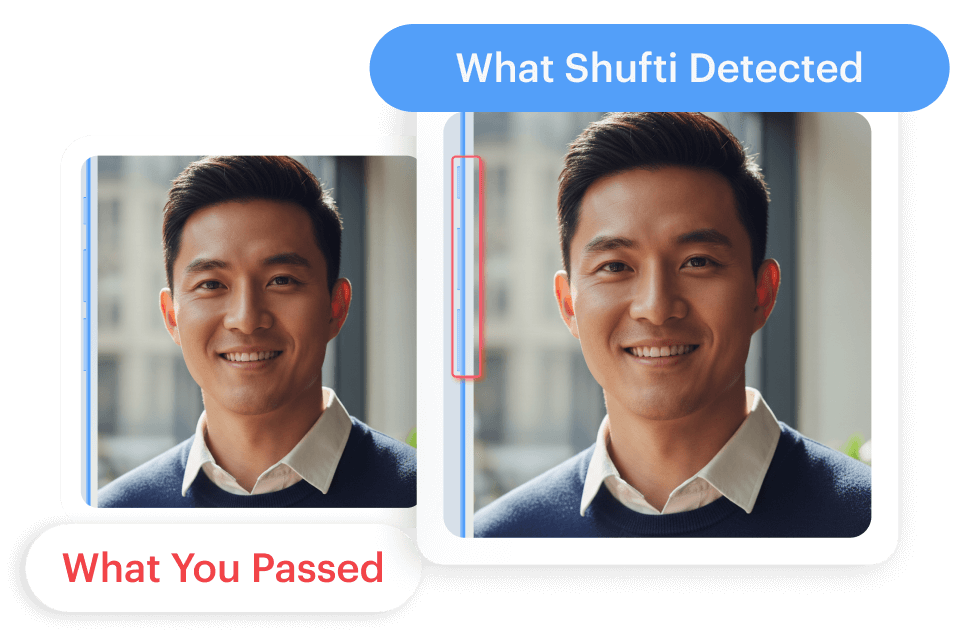
Liveness Detection
Find the replay gaps in your passed
liveness checks.
Runs On Your Cloud
No Data Sharing
No Contract Required
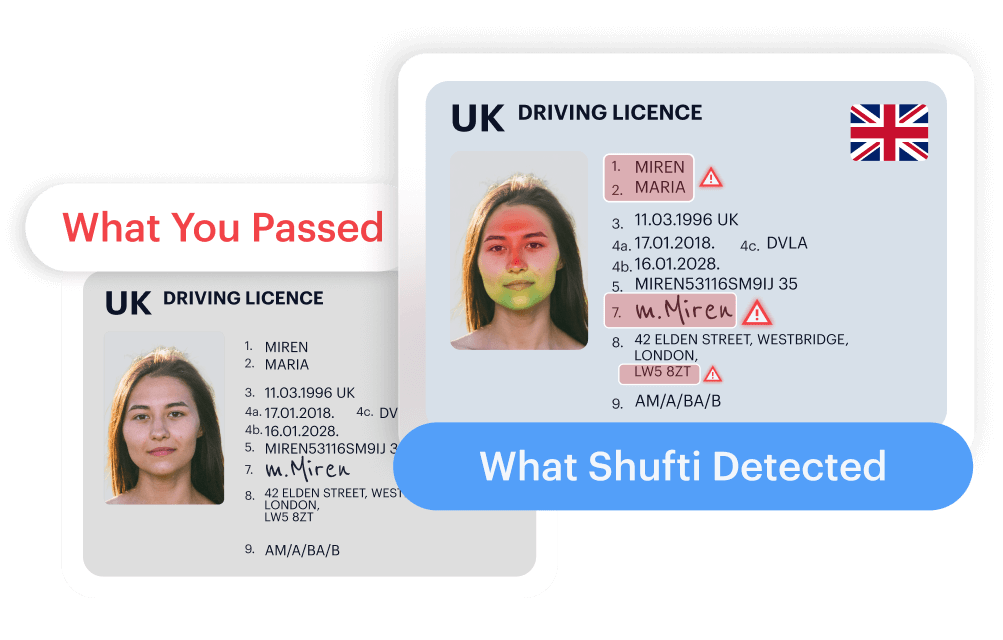
Document Deepfake Detection
Spot synthetic documents hiding in
verified users.
Runs On Your Cloud
No Data Sharing
No Contract Required
Document Originality Detection
Stop fake documents before they pass.
Runs On Your Cloud
No Data Sharing
No Contract Required
Introducing Blind Spot Audit. Spot AI-generated forgeries with advanced document analysis.
 Run Now on AWS
![]()
Introducing Deepfake Detetction. Detect deepfakes with precision your stack has missed.
Run Now on AWS
![]()
Introducing Liveness Detection. Detect spoofs with technology built for sophisticated fraud.
Run Now on AWS
![]()
Introducing Document Deepfake Detection. Spot AI-generated forgeries with advanced document analysis.
Run Now on AWS
![]()
Introducing Document Deepfake Detection
Spot AI-generated forgeries with advanced document analysis.
Run NowIntroducing Document Originality Detection. Verify document authenticity before your next audit.
Run Now on AWS
![]()
Introducing Document Originality Detection
Verify document authenticity before your next audit.
Run Now

User Verification
 Face Verification
 Address Verification
 Document Verification
 Age Verification
 VideoIdent
 Fast ID
 eIDV
eIDV
 NFC Verification
 Consent Verification
Business Onboarding
 Business Verification
 Due Diligence
 Investor Verification
 E-Signature
Authentication
 Behavioural Biometrics
 Device Fingerprinting
 MFA
MFA
 AML Screening
 Business AML Screening
 User Risk Assessment
 Transaction Screening
 Adverse Media Screening

 Identity Verification
 KYC
KYC
 KYB
KYB
 KYI
KYI
 Bonus Abuse
 Fraud Prevention
 Deepfakes
Industries
 Banking
 Crypto
 Fintech
 Forex
Forex
 Gaming
 Gig Economy
 Marketplace
 Social Networks
Role
 Product Managers
 Compliance Officers
 Fraud Analyst
 Global Trust Platform
 Journey Builder
 Vendor Comparison

Knowledge Hub
 Content library
 Blogs
Blogs
 News
News
 Reports
 Insights
 Knowledgebase
 ROI calculator
Blind Spot Audit Suite
 Blind Spot Audit
 Deepfake Detection
 Liveness Detection
 Document Originality
 Document Deepfake
 Events & Webinar
 Podcast Studio
 Spotlight Studio
Developers
 API Documentation
 Mobile SDKs
 Service Status
 Help Center
 Contact Us
 Technical Support
 Compliance
 Supported Document
 About
About
 Career
 Press Release
 Certifications
 Partnership
 Awards
Reports
Access Verification Details
Shufti back-office has an option to access verification details independent of the customers. This
tab displays data for all verifications. This verification data can be sorted by specifying certain
criteria. For this purpose, follow the steps given below:
- Log-in to Shufti back-office using back-office credentials (Email and Password)
- Click on the “Reports” tab
The user can specify some parameters of a verification for the purpose of classification and ease of
access. The parameters include:
- Reference Number
- Services
- Name
- Business Name
- Address
- Country
- DOB
- Time
- Type
- Status
The feature for “Advanced Search” is also available in case the user wants to specify certain
characteristics of the verifications and sort them accordingly.
Advanced Search Parameters:
- Reference ID
- First Name
- Middle Name
- Last Name
- Full Name
- Phone Number
- Country
- Date of Birth
- Full Address
- Status
- Services
- Request Type
- Manually Changed Status
- Document Details
- Document Number
- Issue Date
- Expiry Date
- Document Type
Moreover, the icon next to “Advance Search” allows the user to set the time frame for verifications.
Upon clicking the “Advance Search” icon, the user is given a number of options for classifying the
verifications according to one’s needs.
After setting these parameters, click on the “Details” option next to the verification, under the
“Details” tab.
Note: All these filters can be applied simultaneously and can also be paired with the time frame filter.
Download Verification Details
Shufti back-office has an option to access verification details independent of the customers. This
tab displays data for all verifications.
This verification data can be sorted and downloaded by following the given steps:
- Log-in to Shufti back-office using back-office credentials (Email and Password)
- Click on the “Verifications” tab
The user can specify some parameters of a verification for the purpose of classification and ease of
access. These parameters include;
- Reference
- Services
- Company Name
- Company Registration Number
- Name on Document
- Name On Address Document
- Background Checks Name
- Address
- DOB
- Country
- Time
- Status
- Status Detail
- Last Verification Status Changed By
- Document Number
- Selected Type
- Declined Codes
- Nationality
- Face Match Score
After sorting the verifications that the user wants to download. Click on any of the two icons present
in the top right corner for options to download in, XLSX or CSV.
Click on “XLSX” or “CSV” to download verification details.
Note: The download file contains data of only selective verifications according to the applied filters for sorting.
Delete Verification Data
Shufti back-office has an option to access verification details independent of the customers. This
tab displays data for all verifications. This verification data can be sorted and downloaded by
following the given steps:
- Log-in to Shufti back-office using back-office credentials (Email and Password)
- Click on the “Verifications” tab
After opening the “Verifications” tab, the user can check boxes on the left hand side to select
verifications that need to be deleted.
Click on the “Delete” button on the right-hand side to delete the verification data.
This will delete the data for all verifications selected earlier.
Delete Multiple Verifications
Shufti back-office has an option to delete multiple verifications in one single attempt. By following the steps mentioned below, the user can delete the desired verifications from the reports tab:
- Log-in to Shufti back-office using back-office credentials (Email and Password)
- Click on the “reports” tab
After opening the “reports” tab, the user can check boxes on the left hand side to select verifications that need to be deleted.
Click on the “Delete” icon on the left-hand side to delete the verifications.
This will delete the data for all verifications selected earlier.
Change Verification Status
Shufti back-office has an option to access verification details independent of the customers. This
tab displays data for all verifications.
This verification data can be sorted and downloaded by following the given steps:
- Log-in to Shufti back-office using back-office credentials (Email and Password)
- Click on the “Verifications” tab
Open the “Details” tab against the verification for which you want to change the status. Clicking on
the “Details” button will open a window with verification details.
- Click on “Details”
- In verification details, scroll down to the “Services” tab
On the right corner, click on the “Change Status” button to change the verification status. Upon
clicking this button, a dialog box will appear. The content of this dialog box depends on the services used.
- Click on “Change Status”
The user can select the desired status of each check, click on “Update” to manually change the status.
- Select the desired status for each verification step (“Verify” or “Declined”) and click on “Update”.
Selecting the update status button will change the status of the verification. The user can change the
status multiple times following the same procedure.
Note: Updating the status of a verification from “Declined” to “Accepted” does not imply that Shufti has verified the uploaded document and vice versa.

Thanks For Your Submission.