AMLR Solutions
 AMLR Consultation
 Onboarding
 Ongoing Monitoring
 FRAML
FRAML KYC
KYC KYB
KYB KYI
KYI Age Assurance
 Workforce IAM
 Candidate Verification
 Account Takeover
 Bonus/ Promotion Abuse
 Chargeback Fraud
 Deepfake
 Document Fraud
 Fraud Networks
 Impersonation Fraud
 Money Mule Activity
 Multi-Accounting
 Party Fraud
 Regulatory & Compliance Risks
 Synthetic Identity Fraud
 Adult Content
 Banking
 Crypto
 Fintech
 Forex
Forex Compliance
 Fraud prevention
 Trust & safety
 Global expansion
 Compliance Officers
 Developers
 Fraud Analysts
 Product Managers
 Advanced Journey Builder (AJB)
 Global Trust Platform
 Customer Profiles
 Vendor Comparison
 IDV Case Management
 AML Case Management
 Regulatory Reporting
 Travel Rule Protocols
 Agentic Rule Builder
 AI Compliance Co-Pilot
 Fraud Analytics
 Fraud Hub
 OCR
OCR Shufti AI
 Bank Account Verification
 Biometric Duplication
 Database Checks
 Document Intelligence
 Government ID
 Mobile Driver's License
 NFC
NFC Selfie Liveness
 Brand Personalisation
 Deployment Options
 Identity Methods
 IDV Modes
 Multi-tenancy
 On-Premise IDV
 Secure Capture














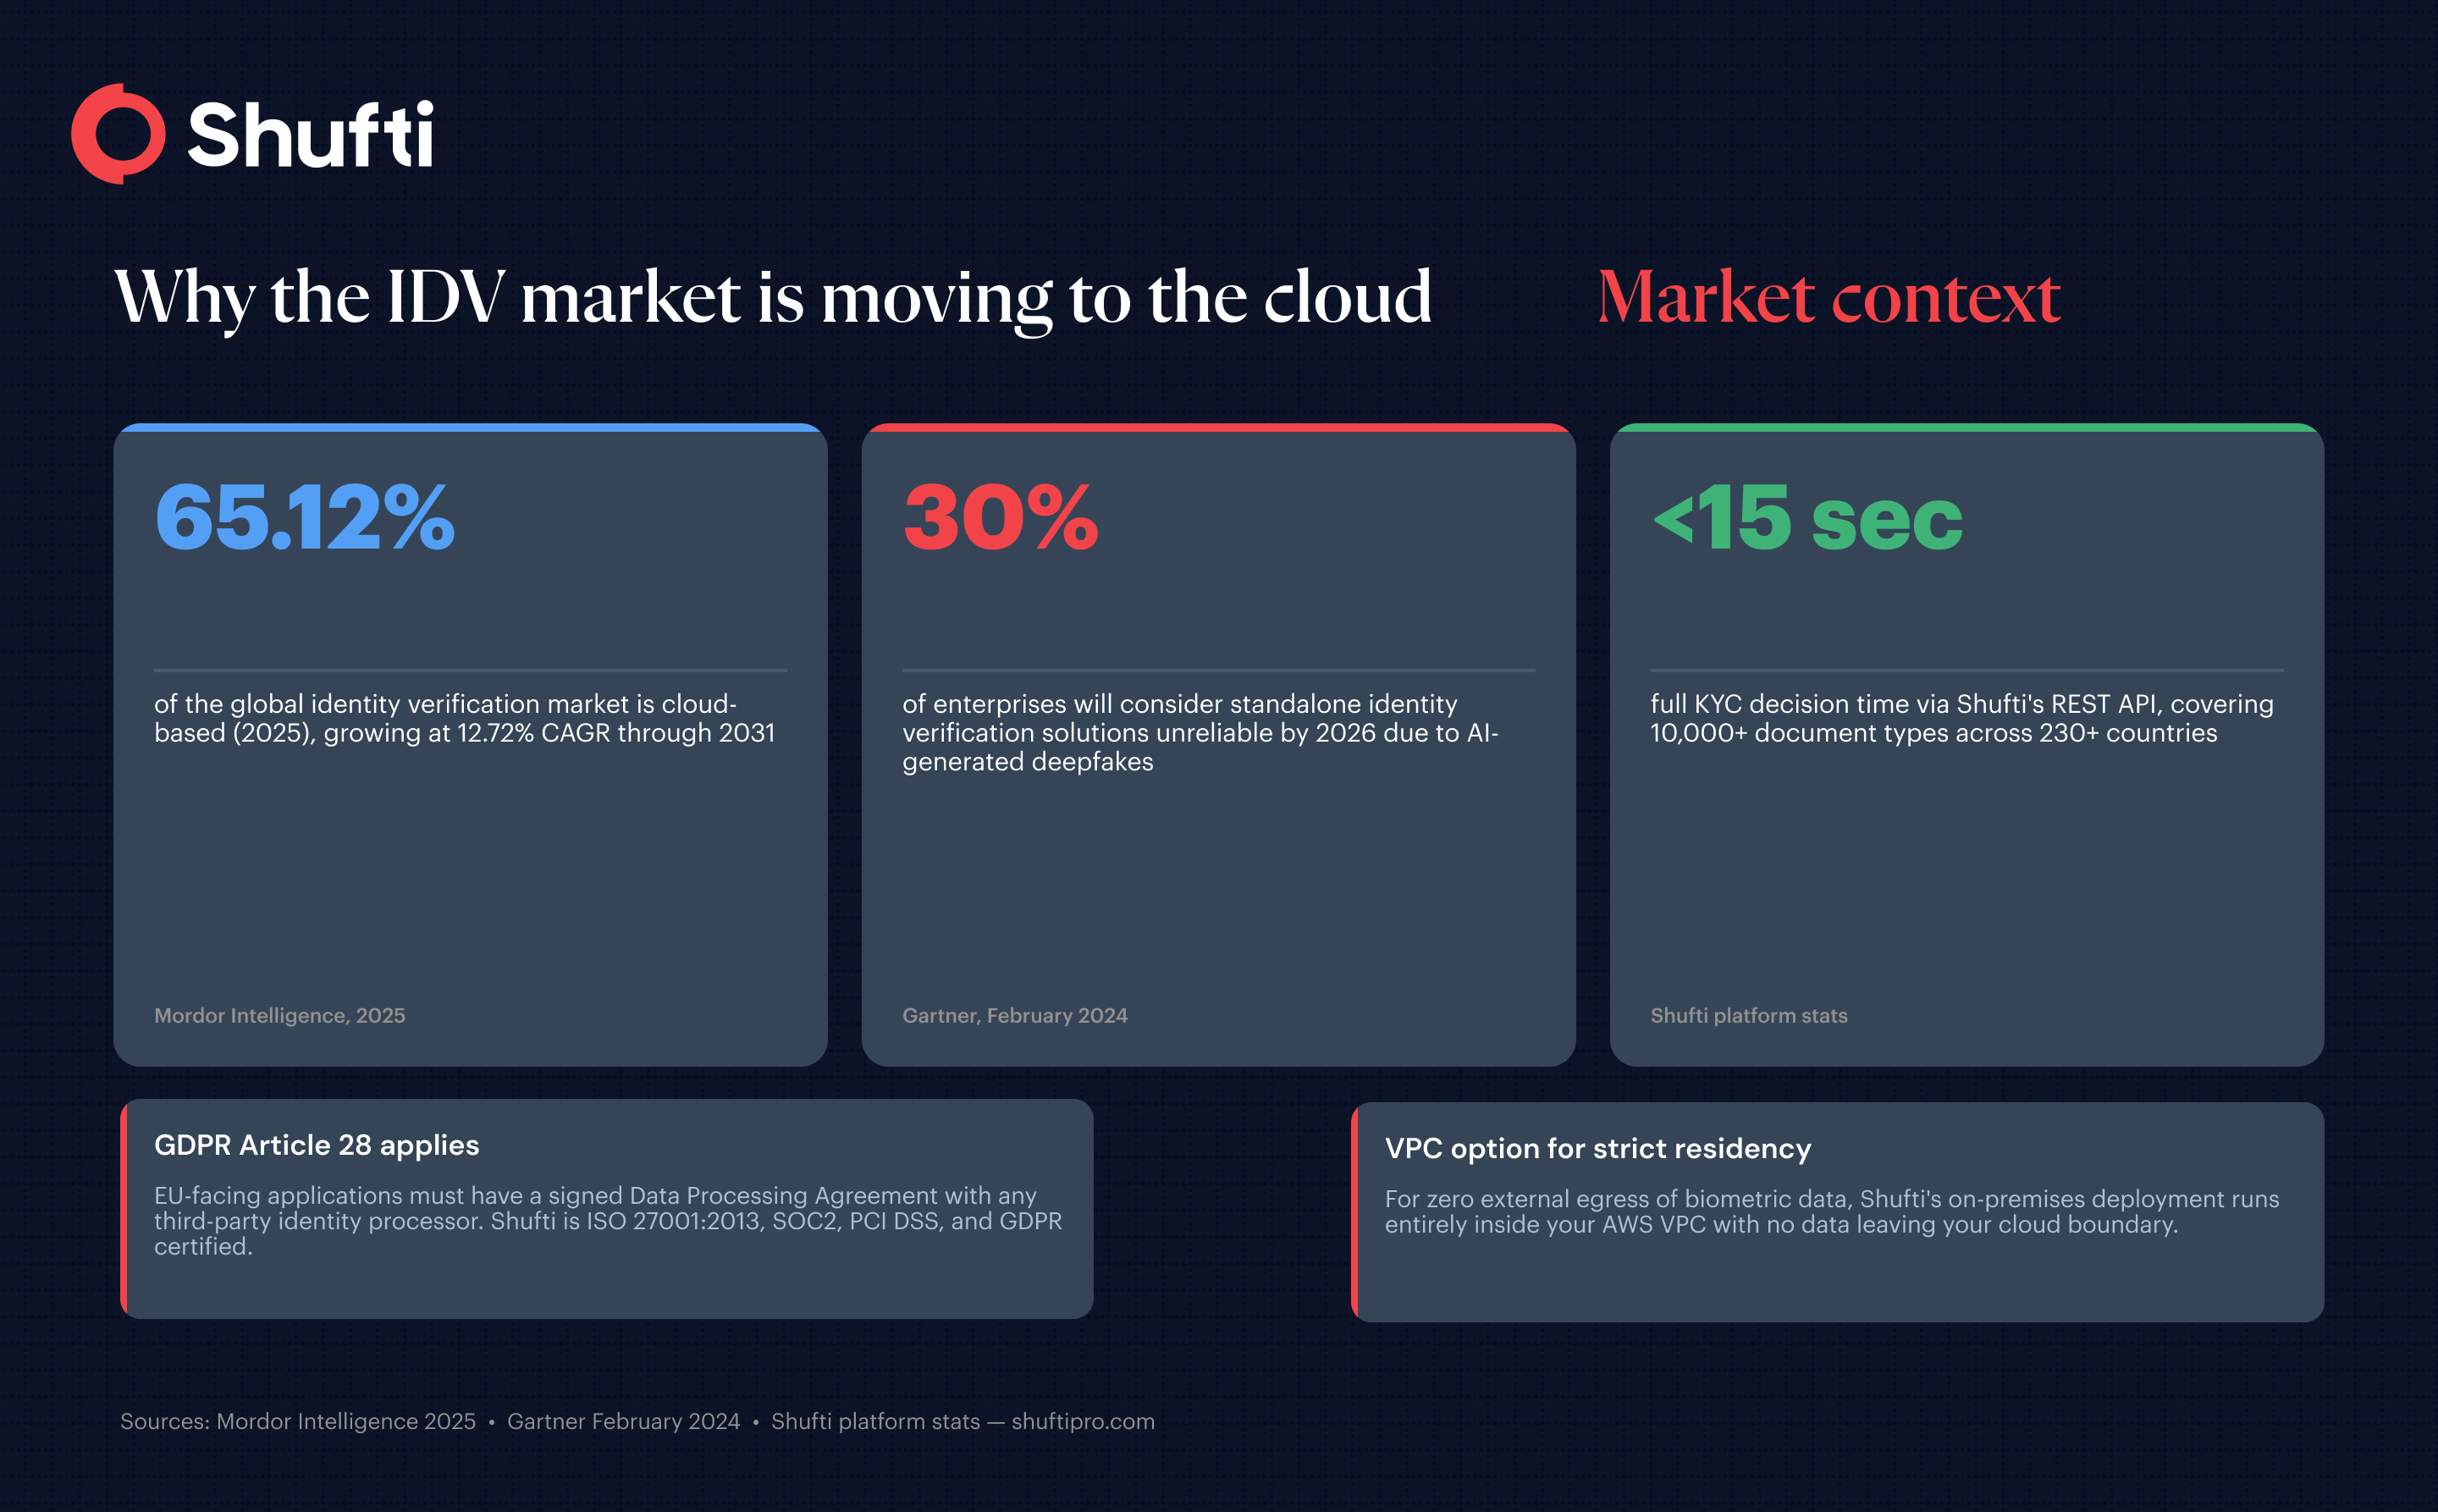
By 2026, 30% of enterprises will consider standalone identity verification solutions unreliable because of AI-generated deepfakes. For the engineering teams tasked with fixing that, the problem is rarely which solution to choose. It’s how to get it running inside an AWS environment without creating credential sprawl, skipping audit trails, or wiring a webhook that drops events under load.
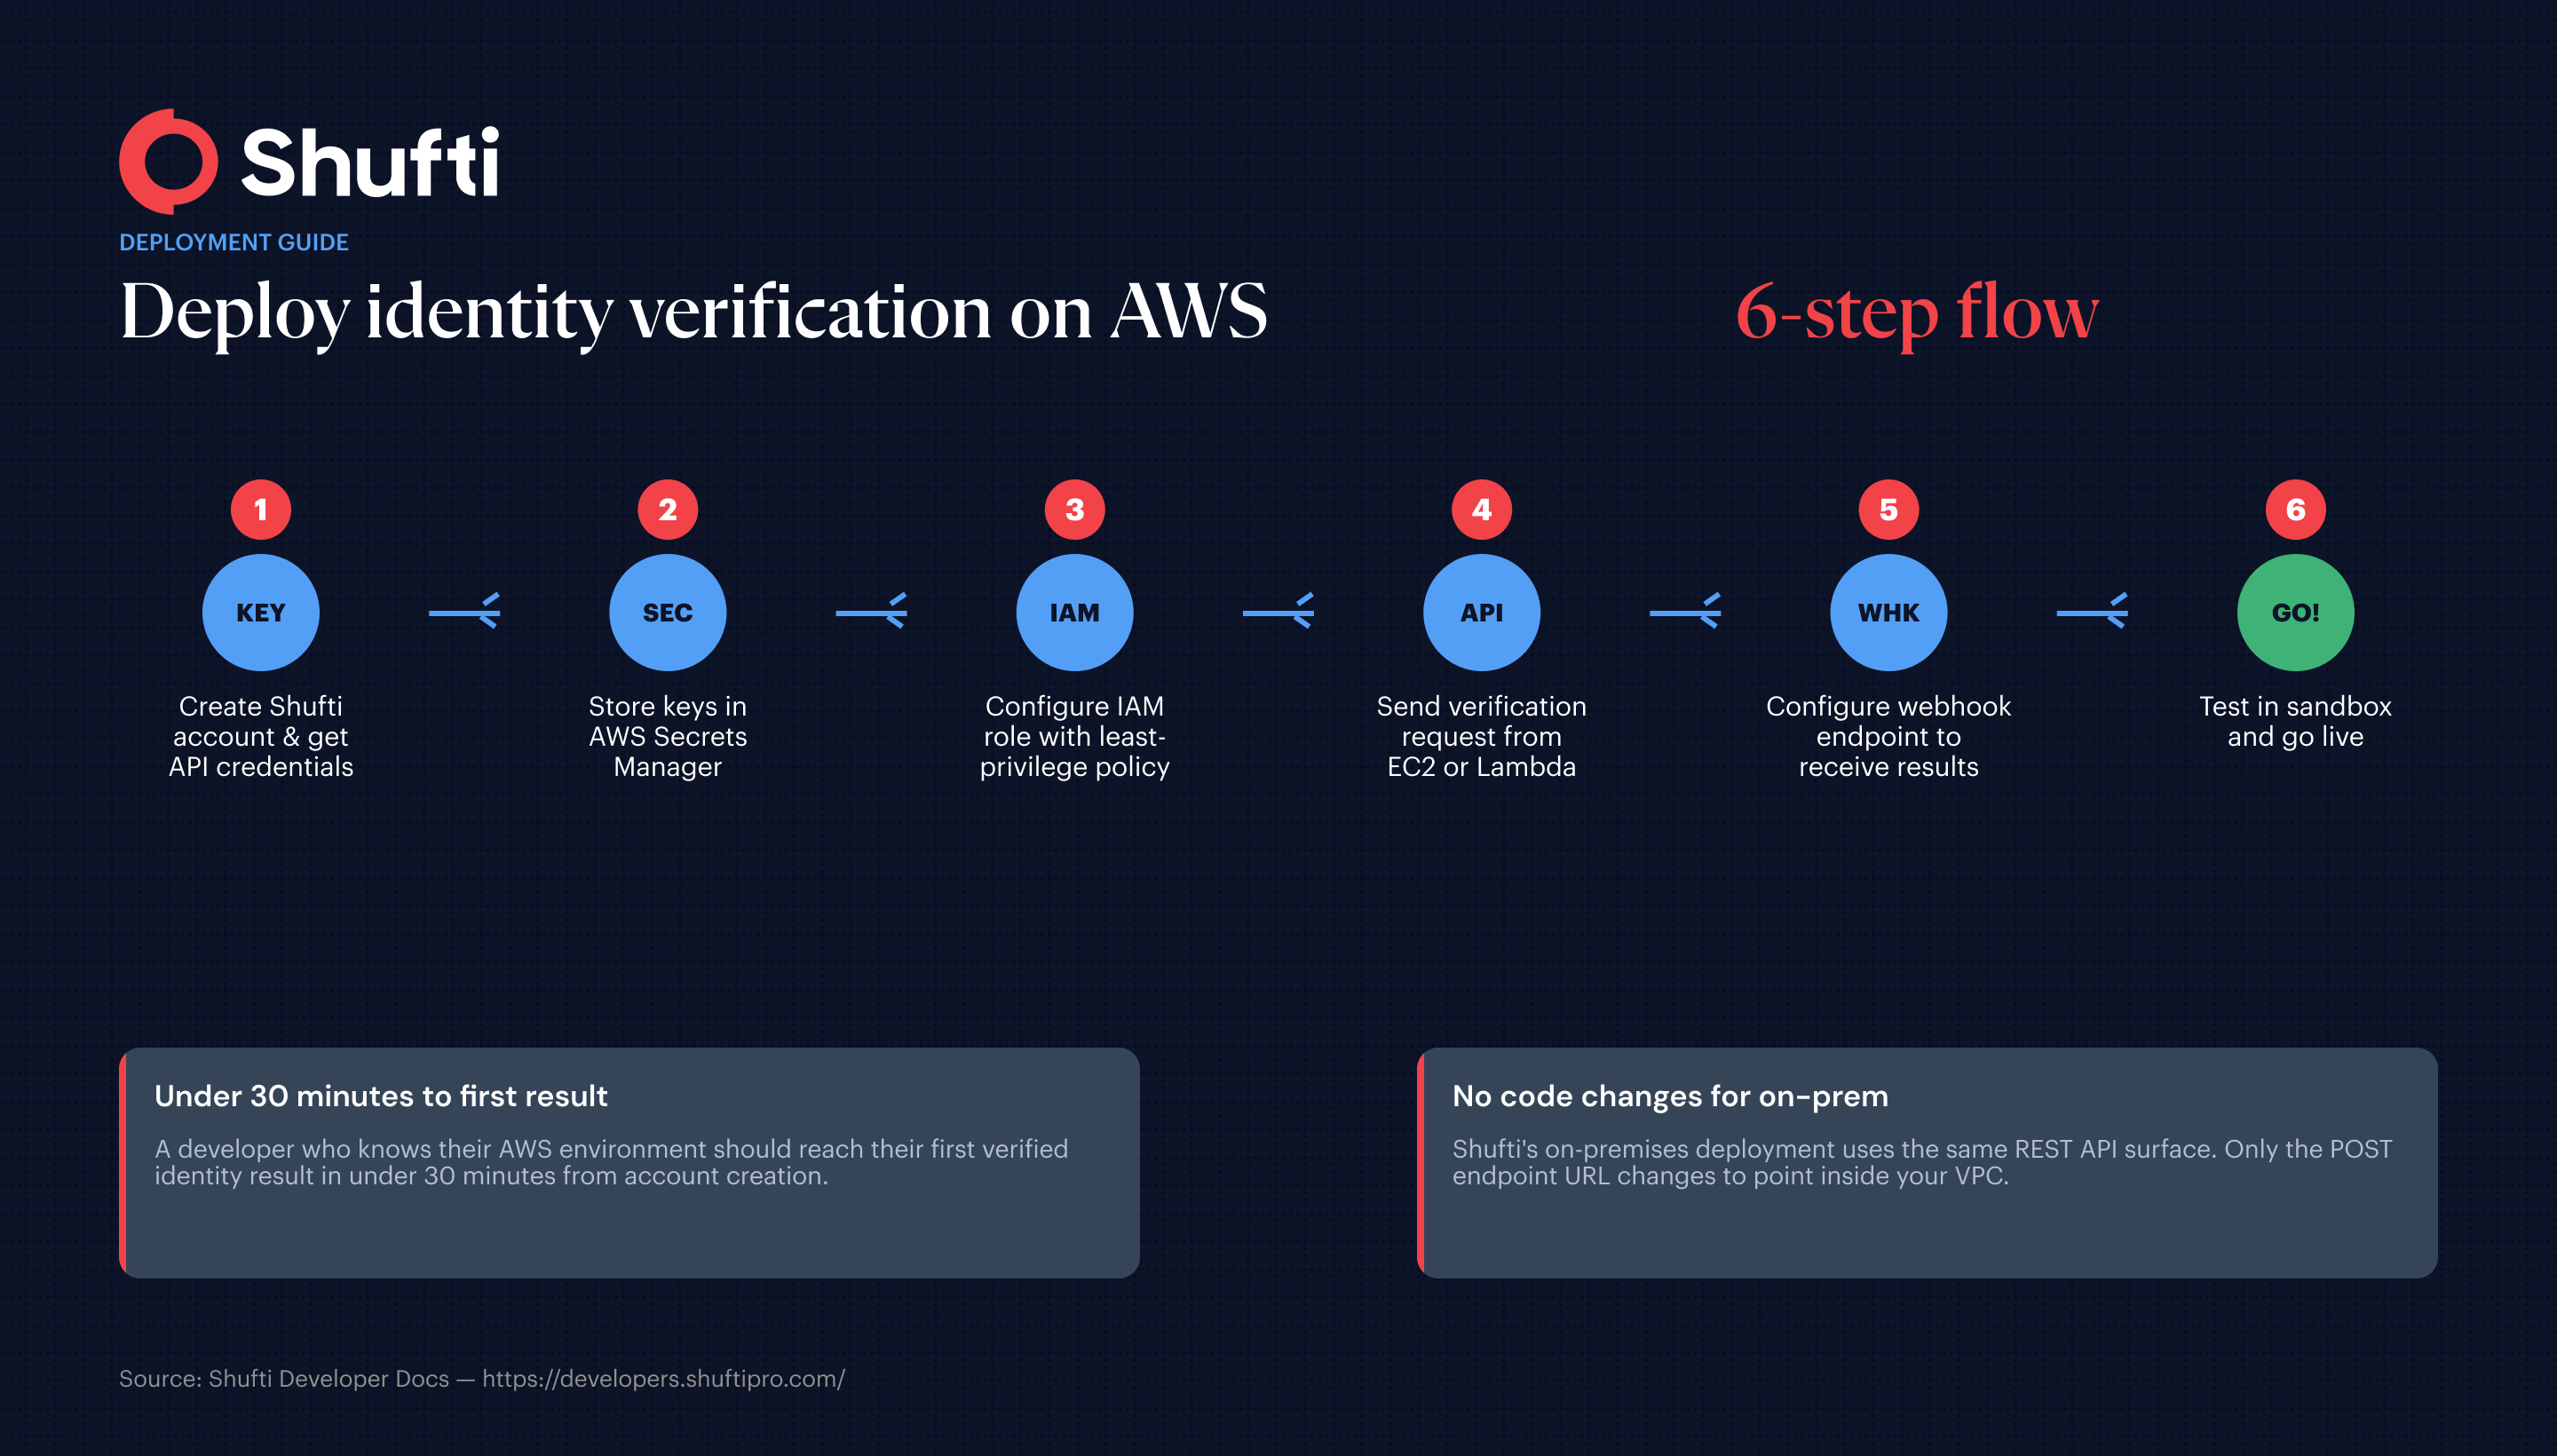
This guide walks you through integrating Shufti’s identity verification REST API into an AWS application. It covers account setup, API key storage in AWS Secrets Manager, IAM role configuration, verification request structure, webhook handler setup, and sandbox testing. A developer who knows their AWS environment should reach their first verified result in under 30 minutes.
Why teams building on AWS choose an API-first identity check?
Cloud-based identity verification now holds 65.12% of the global IDV market and is growing at 12.72% CAGR through 2031. That share reflects where engineering workloads already live. When your application runs on EC2 or Lambda, adding a verification step via a REST call fits the architecture your team already manages, including IAM roles, CloudWatch logs, environment secrets, and webhook endpoints.
The alternative is building your own document OCR, face comparison, and liveness stack from scratch, which takes months and carries ongoing model maintenance. Shufti’s API returns a pass or fail decision in under 15 seconds, with document verification covering 10,000+ document types across 240+ countries and face verification running active liveness checks on every biometric match. AWS handles your compute and networking. Shufti handles the compliance logic.
What you need before the first API call?
You need three things in place before writing any code.
First, a Shufti account. Visit developers.shuftipro.com to sign up and access the developer portal. The portal gives you a Client ID and a Secret Key on signup. Keep these out of your source code.
Second, an AWS account with the right permissions. Confirm you can create IAM roles and policies, read from Secrets Manager, and deploy EC2 instances or Lambda functions. If you plan to receive results asynchronously via webhook, you also need an API Gateway or Application Load Balancer endpoint.
Third, a test ID document and a device with a camera for sandbox runs. Shufti’s sandbox environment accepts real scans and returns synthetic results, so you can validate your full integration flow before any production data moves.
How to deploy Shufti on AWS: the step-by-step
Step 1. Store your API credentials in AWS Secrets Manager
Create a new secret in Secrets Manager of type “Other type of secret.” Add two key-value pairs, one for your Client ID and one for your Secret Key. Name the secret something environment-specific, such as shufti/production or shufti/staging.
Your Lambda or EC2 role retrieves these values at runtime. This matters beyond security hygiene. If your application goes through a SOC2 or ISO 27001 audit, auditors look for centralized, access-controlled credential management rather than API keys in environment variables or source files.
Step 2. Configure an IAM role with least-privilege access
Create an IAM role for your EC2 instance or Lambda function. Attach a policy that grants secretsmanager:GetSecretValue on the specific secret ARN you created in Step 1, plus logs:CreateLogGroup, logs:CreateLogStream, and logs:PutLogEvents for CloudWatch visibility.
Do not attach AmazonSecretsManagerReadWriteAccess or AdministratorAccess to your application role. Least-privilege is a standard control requirement in ISO 27001 and SOC2 audits, not just a recommendation.
Step 3. Send your first verification request
Shufti’s API uses Bearer Token authentication. Your application retrieves the Client ID and Secret Key from Secrets Manager, base64-encodes them, and exchanges them for a short-lived access token via POST /access-token. The full token endpoint and request schema are documented at the Shufti API reference.
With a valid token, construct your verification request payload. Specify the services you need, such as document for ID document checks, face for biometric matching, or both. POST the payload to https://api.shuftipro.com/ with the Authorization: Bearer <token> header. Simple checks return a synchronous result. Complex or multi-service checks return an event_id for webhook delivery.
Step 4. Configure your webhook endpoint
Set the callback_url field in your verification payload to your API Gateway or ALB endpoint. Shufti calls this URL with the verification result when processing is complete.
Your webhook handler should validate the incoming request signature, parse the result object, and act on the status field. A status of approved passes the user through your onboarding flow. The declined status routes the applicant to your manual review queue or rejection logic. When the result is review, the check requires human inspection before a final decision is recorded.
Log every callback event to CloudWatch with the event_id, status, and timestamp. This gives your compliance team an auditable record without your system storing raw biometric data locally.
Step 5. Run sandbox tests before going live
Shufti’s sandbox environment mirrors production behaviour. Test each verification service you plan to use, covering happy-path approvals, declined documents, and timeout handling. Use the KYC API reference alongside the developer docs to build payloads for each scenario.
Once your sandbox flow runs cleanly through the webhook handler, update your Secrets Manager values with production credentials, point the callback_url to your production endpoint, and deploy.
Data residency and compliance considerations
For applications processing EU residents’ personal data, GDPR Article 28 requires a Data Processing Agreement with any third-party processor handling that data. Shufti is ISO 27001:2013, SOC2, PCI DSS, and GDPR certified, and can provide a signed DPA on request.
If your compliance posture requires that biometric data never leave your own cloud boundary, Shufti offers an on-premises deployment option that runs inside your AWS VPC with no external egress for document images or facial scans. The REST API surface is identical, so the steps above apply with one change. The POST endpoint points to your internal load balancer rather than to api.shuftipro.com. AWS has also published a reference architecture guide for identity verification on AWS that covers additional infrastructure patterns for this use case.
Before you ship to production, read why KYC software deployments fail when they meet real-world conditions. The failure points are predictable and most can be caught in your sandbox phase.
Final Thoughts
Identity verification on AWS is a solved problem at the API level, but missing audit trails, credential sprawl, and fragile webhook implementations are where most engineering teams lose sprint cycles. Shufti’s REST API fits the infrastructure patterns your team already manages on AWS, returning a compliant identity decision in under 15 seconds, with built-in deepfake detection, document checks, and biometric matching across 240+ countries.
|
Request a demo to walk through the integration against your specific stack and compliance requirements. |
Frequently Asked Questions
What EC2 instance type do I need to run Shufti on AWS?
Shufti is an API service, not software you install on an EC2 instance. Your EC2 or Lambda function makes outbound HTTPS calls to Shufti's API and receives results via webhook. Any instance type that can handle outbound HTTPS requests works. No GPU or high-memory configuration is required on your side.
Do I need a Shufti account before integrating?
Yes. You need a Client ID and a Secret Key before making any API calls. Sign up at the Shufti developer portal to create an account. Setup takes a few minutes, and the sandbox environment is available immediately so you can start testing without production credentials.
Can I run Shufti inside a private VPC with no external internet access?
Shufti's on-premises deployment option runs inside your AWS VPC with no external egress for document images or biometric data. Verification requests and results stay within your private network. Contact Shufti's team to discuss the on-premises model and the DPA requirements for your compliance posture.
How long does the full setup take?
From account creation to a first successful sandbox API call, most developers complete the setup in under 30 minutes. Webhook configuration adds time depending on your infrastructure, but the API itself requires only an access token, a JSON payload, and an endpoint to receive results.
What happens to biometric data after a verification check?
Shufti processes document images and facial scans to produce a verification decision and handles data in accordance with its published retention policy and any DPA your organisation has in place. For teams with strict data residency requirements, the on-premises deployment option keeps all biometric data inside your own cloud boundary.